

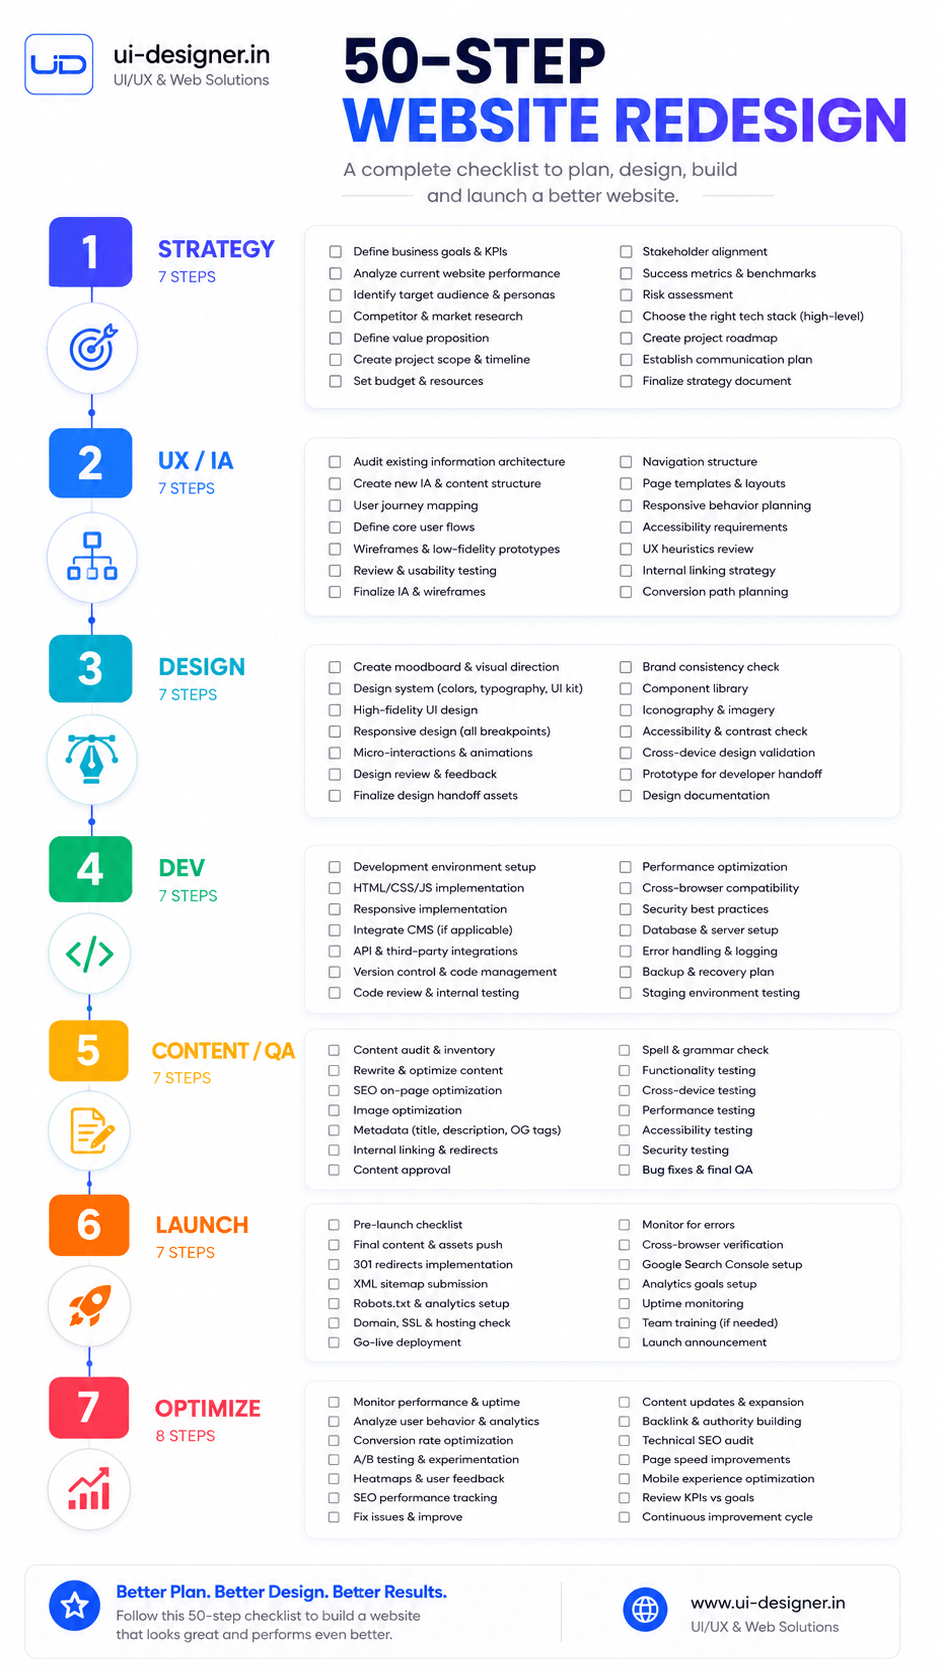
A website redesign is one of the highest-leverage projects a business can undertake. Done right, it improves conversion rates, reduces bounce, strengthens brand perception, and directly impacts revenue. Done wrong, it wastes months of budget, tanks SEO rankings, and launches a site that performs worse than the old one.
This 50-step checklist is the exact framework we use at UI Designer for every redesign project. It covers strategy, UX, design, development, SEO, and launch — so nothing falls through the cracks.
Phase 1: Strategy & Discovery (Steps 1–8)
1. Define the Business Case
Document *why* you are redesigning. Is it low conversion? Outdated brand? Poor mobile experience? Replatforming? Every decision downstream should trace back to this.
2. Set Measurable Goals (KPIs)
Define success metrics with baselines and targets:
- Conversion rate (current → target)
- Average order value / lead value
- Organic traffic (sessions, keywords)
- Page load speed (LCP, INP, CLS)
- Bounce rate / engagement time
- Accessibility score (WCAG level)
3. Audit the Current Site
Run a comprehensive audit covering:
- **Analytics**: Top pages, exit pages, user flows, device breakdown
- **SEO**: Current rankings, indexed pages, backlink profile, technical issues
- **Performance**: Core Web Vitals, Lighthouse scores, real-user metrics
- **Accessibility**: Automated scan + manual keyboard/screen reader test
- **Content**: ROT analysis (Redundant, Outdated, Trivial)
- **Technical**: CMS version, plugin debt, security vulnerabilities, hosting
4. Interview Stakeholders & Users
- Internal: Sales, support, marketing, leadership (what do they hear from customers?)
- External: 5–8 user interviews or unmoderated usability tests on current site
- Competitive: 3–5 competitor sites analyzed for strengths, gaps, conventions
5. Define Target Audiences & Personas
Create 2–4 primary personas with:
- Demographics, role, goals, pain points
- Key tasks on the website
- Objections and decision criteria
- Device and context of use
6. Map User Journeys
For each persona, map the current and ideal journey:
- Entry points (organic, paid, direct, referral)
- Key pages visited
- Conversion funnel steps
- Drop-off points (from analytics)
- Post-conversion experience
7. Conduct Content Strategy Workshop
Decide: What stays, what goes, what needs rewriting, what needs creating. Assign ownership for each content piece. Create a content production calendar aligned with design timeline.
8. Choose the Right Platform/CMS
Evaluate against requirements (not preferences):
- Content model flexibility
- Editor experience for your team
- Developer extensibility
- Performance baseline
- Security track record
- Total cost of ownership (licensing, hosting, maintenance)
- *Common choices: WordPress, Sanity, Contentful, Strapi, Statamic, custom*
Phase 2: UX & Information Architecture (Steps 9–16)
9. Create or Refine Sitemap
- Card sort with stakeholders/users if IA is changing significantly
- Define primary, secondary, and utility navigation
- Plan for scalability (where do new sections live?)
- Document URL structure and redirect map early
10. Define Page Types & Templates
Audit every unique page layout needed. Typical set:
- Homepage
- Landing page variants (campaign, product, solution)
- Content pages (About, Team, Careers, Press)
- Blog/Resource center (listing, category, article)
- Product/Service pages (listing, detail, comparison)
- Conversion pages (Contact, Demo, Quote, Checkout)
- User account (Dashboard, Settings, Billing)
- Legal (Privacy, Terms, Cookie Policy)
- 404, Search results, Thank you
11. Design User Flows for Critical Paths
Flowchart the top 3–5 conversion paths:
- Anonymous → Lead → MQL → SQL
- Visitor → Product page → Cart → Checkout → Order confirmation
- User → Login → Dashboard → Key action → Success state
12. Create Low-Fidelity Wireframes
Wireframe every template type. Focus on:
- Content hierarchy and priority
- Component placement (not visual design)
- Responsive behavior (mobile ↔ desktop)
- Edge cases (empty states, long content, errors)
13. Validate Wireframes with Stakeholders
Walk through each wireframe. Get sign-off on structure *before* visual design. Changes here cost 10x less than in high-fidelity or code.
14. Define Component Library Requirements
List every reusable component needed:
- Navigation (header, footer, mega menu, breadcrumbs)
- Content blocks (hero, feature grid, testimonial, CTA banner)
- Forms (contact, lead capture, checkout, search, filters)
- Media (image gallery, video embed, carousel, accordion)
- Data display (tables, pricing cards, comparison, stats)
- Feedback (toast, modal, tooltip, progress)
15. Plan Accessibility from the Start
- Define heading hierarchy rules
- Specify focus states for every interactive element
- Plan skip links, landmark regions, ARIA labels
- Choose color palette meeting WCAG AA contrast (4.5:1 text, 3:1 UI)
- Document alt text guidelines for content team
16. Create Functional Prototype
Build clickable prototype in Figma for:
- Primary user flows
- Responsive breakpoints
- Key interactions (dropdowns, modals, accordions)
- Conduct 5-user usability test on prototype
Phase 3: Visual Design & Design System (Steps 17–26)
17. Establish Visual Direction
Moodboard with 3 distinct directions. Present to stakeholders with rationale tied to brand strategy and user personas. Get decision on *one* direction.
18. Define Design Tokens
Create the single source of truth for:
- Color palette (primary, secondary, semantic, neutral, data viz)
- Typography scale (font families, sizes, line heights, weights)
- Spacing scale (base unit, multiples, component padding)
- Border radius, shadows, elevation
- Breakpoints (mobile, tablet, desktop, wide)
- Animation/transition tokens (duration, easing)
- Z-index scale
19. Design Core Components in Figma
Build each component as a Figma component with:
- Variants (size, state, content variations)
- Auto-layout for responsiveness
- Documentation (usage, do/don't, accessibility notes)
- Mapping to code component names
20. Design All Page Templates (High-Fidelity)
Apply components to every template. Design for:
- Real content (not lorem ipsum)
- Realistic data densities
- All breakpoints (320px, 768px, 1024px, 1440px+)
- Dark mode (if required)
- Print stylesheet (if needed)
21. Design System Documentation
Create a living design system site (Storybook, Zeroheight, Figma DevMode, or Notion):
- Component library with code snippets
- Design token reference
- Accessibility guidelines
- Contribution process
- Versioning and changelog
22. Design Review & Sign-Off
Formal review with:
- Stakeholders (brand, marketing, product)
- Lead developer (feasibility, performance flags)
- Accessibility reviewer (if separate)
- Document approved versions with version numbers
23. Prepare Developer Handoff
In Figma DevMode or equivalent:
- Annotated specs (spacing, typography, colors)
- Asset exports (SVG icons, WebP images at 1x/2x/3x)
- Interaction specs (hover, focus, active, disabled, loading)
- Responsive behavior notes
- Component-to-code mapping
24. Create Design QA Checklist
Define what "design fidelity" means for developers:
- Pixel tolerance (e.g., ±2px spacing, ±1px typography)
- Font rendering expectations
- Animation fidelity
- Breakpoint behavior
- Component variant coverage
25. Plan for Design Maintenance
- Who owns the Figma file post-launch?
- How are design changes requested and prioritized?
- Design system versioning strategy
- Design token sync with code (Style Dictionary, Tokens Studio)
26. Archive & Version Control
- Tag approved design version in Figma
- Export PDF of all screens for reference
- Store design rationale for future decisions
Phase 4: Development & Implementation (Steps 27–38)
27. Set Up Project Infrastructure
- Repository with branching strategy (main, develop, feature branches)
- CI/CD pipeline (lint, typecheck, test, build, deploy preview)
- Development environment (Docker, dev containers, or local stack)
- Code quality tools (ESLint, Prettier, Stylelint, Husky)
- Component library setup (Storybook, Chromatic)
28. Implement Design Tokens in Code
- Convert Figma tokens to code (Style Dictionary, Tailwind config, CSS custom properties)
- Automate token sync from Figma → code
- Verify token parity with visual regression tests
29. Build Component Library (Code)
Develop each component with:
- TypeScript interfaces for props
- Storybook stories for all variants
- Unit tests (Vitest/Jest + React Testing Library)
- Accessibility tests (axe-core in CI)
- Visual regression tests (Chromatic/Percy)
- Documentation (MDX/Storybook Docs)
30. Implement Page Templates
Build each template using components:
- Server-side rendering (Next.js, Nuxt, Astro) or SSG
- Responsive layouts matching designs
- SEO metadata components (dynamic per page)
- Structured data (JSON-LD) per template type
31. CMS Integration & Content Modeling
- Define content types matching page templates
- Build modular content blocks (portable text, component mapping)
- Set up preview mode (draft content visible in preview)
- Configure image optimization (responsive srcset, WebP/AVIF)
- Content migration scripts (if replatforming)
32. Build Custom Functionality
- Forms with validation, spam protection, analytics events
- Search (Algolia, Meilisearch, or native)
- User authentication (NextAuth, Clerk, custom)
- E-commerce (Shopify Hydrogen, Medusa, custom)
- Integrations (CRM, marketing automation, analytics)
33. Implement Analytics & Tracking
- GA4 / Matomo / Plausible setup
- Event taxonomy (naming convention, parameters)
- Enhanced e-commerce (if applicable)
- Consent management (cookie banner, GDPR/CCPA)
- Server-side tracking (for accuracy)
34. Performance Optimization
- Image optimization (next/image, picture element, AVIF/WebP)
- Font optimization (subset, preload, font-display: swap)
- Code splitting (dynamic imports, route-level)
- Caching strategy (static assets, API responses, HTML)
- Third-party script audit (remove, defer, or self-host)
- Bundle analysis (webpack-bundle-analyzer, @next/bundle-analyzer)
35. Accessibility Implementation
- Semantic HTML (landmarks, headings, lists, buttons, links)
- Keyboard navigation (focus order, skip links, focus trapping)
- ARIA only where HTML cannot achieve the same
- Screen reader testing (NVDA, VoiceOver, TalkBack)
- Color contrast verification in browser
- Reduced motion support
36. Cross-Browser & Device Testing
Test matrix:
- Chrome, Firefox, Safari, Edge (latest 2 versions)
- iOS Safari, Chrome Android (latest 2)
- Viewports: 320, 375, 768, 1024, 1440, 1920
- Real devices (not just emulators): iPhone, Android, iPad, desktop
37. SEO Technical Implementation
- Unique, descriptive titles and meta descriptions per page
- Canonical URLs, hreflang (if multilingual)
- XML sitemap (auto-generated from CMS)
- robots.txt (allow CSS/JS, disallow admin)
- Structured data: Organization, BreadcrumbList, Article, Product, FAQPage
- Redirect map implemented (301 for all changed URLs)
- Core Web Vitals monitoring in place
38. Security Hardening
- HTTPS everywhere (HSTS, secure cookies)
- Content Security Policy (CSP) headers
- X-Frame-Options, X-Content-Type-Options, Referrer-Policy
- Dependency scanning (npm audit, Snyk, Dependabot)
- Form spam protection (honeypot, reCAPTCHA v3, Cloudflare Turnstile)
- Rate limiting on APIs
- Input validation and sanitization
Phase 5: Content Population & QA (Steps 39–44)
39. Content Entry in CMS
- Populate all pages with final approved content
- Write alt text for every meaningful image
- Configure SEO fields per page
- Set up redirects in CMS or hosting layer
40. Design QA (Design Review in Browser)
Designer compares live implementation against Figma:
- Visual fidelity (spacing, typography, colors, shadows)
- Component variant coverage
- Responsive behavior at all breakpoints
- Interaction fidelity (hover, focus, loading, error states)
- Document discrepancies in shared tracker
41. Functional QA
- Every form submits correctly (success, error, validation)
- All links work (internal, external, anchor)
- Search returns relevant results
- Authentication flows (login, logout, password reset, protected routes)
- E-commerce flow (cart, checkout, payment, confirmation, email)
- CMS preview mode works for editors
42. Performance Audit (Pre-Launch)
Run Lighthouse CI in pipeline. Targets:
- Performance: ≥90
- Accessibility: ≥95
- Best Practices: ≥90
- SEO: ≥90
- Core Web Vitals (field data via CrUX or RUM): LCP <2.5s, INP <200ms, CLS <0.1
43. Accessibility Audit (Pre-Launch)
- Automated: axe-core in CI (zero violations)
- Manual: Keyboard-only navigation of all flows
- Screen reader: NVDA (Windows) + VoiceOver (Mac/iOS)
- Color contrast: All text meets WCAG AA
- Zoom test: 200% zoom, no loss of content/function
44. Stakeholder UAT (User Acceptance Testing)
- Share staging environment with stakeholders
- Provide test scripts for critical paths
- Collect feedback in structured format (bug, improvement, question)
- Triage: Must-fix (launch blocker) vs. Follow-up (post-launch)
Phase 6: Launch Preparation (Steps 45–48)
45. Final Redirect Map Verification
- Crawl old site (Screaming Frog) → list all URLs
- Map every URL to new destination (1:1 or best match)
- Implement 301 redirects at hosting/CDN level (not plugin)
- Test 50+ random redirects manually
46. Pre-Launch Checklist
- [ ] SSL certificate valid and auto-renewing
- [ ] DNS TTL lowered 24h before launch (300s)
- [ ] Production environment variables set
- [ ] Analytics and tracking verified on staging
- [ ] Search Console property ready (new or existing)
- [ ] XML sitemap submitted
- [ ] robots.txt correct for production
- [ ] Error monitoring (Sentry, LogRocket) connected
- [ ] Uptime monitoring (Better Uptime, Pingdom) configured
- [ ] Backup strategy verified (database, assets, CMS content)
47. Launch Day Runbook
Document step-by-step:
- Who does what, in what order
- DNS switch procedure
- Smoke tests post-DNS (homepage, key pages, forms, checkout)
- Rollback plan (DNS revert, previous deploy)
- Communication plan (internal Slack, status page, client notification)
- Go/No-go criteria
48. Launch!
Execute runbook. Monitor:
- Real-user Core Web Vitals (Search Console, web-vitals library)
- Error rates (Sentry)
- Uptime (monitoring)
- Form submissions, transactions
- Search Console indexing (URL Inspection on key pages)
Phase 7: Post-Launch & Optimization (Steps 49–50)
49. 30-Day Hypercare Period
- Daily: Error monitoring, uptime, Core Web Vitals
- Weekly: Analytics review (traffic, conversions, behavior)
- Bi-weekly: Stakeholder check-in
- Fix: Critical bugs, performance regressions, content issues
- Document: Lessons learned, design system updates needed
50. Continuous Improvement Plan
- Quarterly: Full analytics + SEO + performance review
- Monthly: Content updates, blog posts, case studies
- Per sprint: Design system improvements, component refinements
- Annually: Strategic redesign assessment (is the site still serving business goals?)
Bonus: Redesign Risk Mitigation
| Risk | Mitigation | |------|------------| | SEO traffic drop | Comprehensive redirect map, preserve content URLs, monitor Search Console daily | | Launch delays | Fixed-scope phases, buffer in timeline, phased launch option | | Budget overrun | Fixed-price phases, change request process, monthly budget reviews | | Design-development mismatch | Design system, DevMode figma-to-production-handoff-guide-2026" class="internal-link">handoff, design QA in browser | | Content bottleneck | Content-first approach, professional copywriter, redesign-checklist-50-steps" class="internal-link">migration scripts | | Stakeholder scope creep | Signed-off sitemap, template list, revision limits in contract | | Performance regression | Performance budgets in CI, Lighthouse CI gate, RUM monitoring |
Download the Checklist
Get the printable PDF version with checkboxes and a Notion template you can duplicate: [ui-designer.in/redesign-checklist](https://ui-designer.in/redesign-checklist)
Need Help With Your Redesign?
We've guided 50+ businesses through redesigns that moved the needle. Book a free strategy call — we'll audit your current site and give you a clear roadmap with timeline and investment range.
Frequently Asked Questions
Frequently Asked Questions
- How long does a typical website redesign take?
- 3-5 months for a 20-50 page business site. Phase breakdown: Strategy (2-3 weeks), UX/IA (3-4 weeks), Design (4-6 weeks), Development (6-8 weeks), Content/QA (3-4 weeks), Launch (1 week). Complex apps: 6-12 months.
Frequently Asked Questions
- Will I lose SEO traffic during a redesign?
- Not if you: map every old URL to new (1:1 redirects), preserve content hierarchy, keep same canonical URLs where possible, monitor Search Console daily for 30 days post-launch. Traffic dip of 10-15% for 2-4 weeks is normal; recovery in 4-8 weeks.
Frequently Asked Questions
- Should I redesign and replatform at the same time?
- Avoid if possible. Redesign (visual/UX) + Replatform (CMS/tech) = 2x risk, 2x timeline. Do redesign first on current CMS, then replatform. Or replatform first with current design, then redesign.
Frequently Asked Questions
- How much should I budget for a redesign?
- 20-page marketing site: ₹15-30L. 50-page + CMS: ₹30-60L. E-commerce: ₹40-80L. Custom web app: ₹60L+. Includes strategy, design, development, content migration, QA, launch. Ongoing: 15-20% of build cost annually.
Frequently Asked Questions
- What's the #1 reason redesigns fail?
- Content bottleneck. Design/development ready but content not written. Fix: content-first approach — final copy before design, professional copywriter, migration scripts ready. Content delays cost 3-5x more in development.
Frequently Asked Questions
- How do I choose between agency and freelancer for redesign?
- Agency (₹25L+): design+dev integrated, PM, QA, continuity, accountability. Freelancer (₹8-20L): you manage, higher risk, good for simple scopes. See our "Agency vs Freelancer" guide for decision framework.
Frequently Asked Questions
- What's the post-launch "hypercare" period?
- 30 days of daily monitoring: errors, uptime, Core Web Vitals, form submissions, Search Console indexing. Weekly analytics reviews. Fix critical bugs free. Document lessons for design system updates.